


In setting up my Kubernetes from Scratch environment, I wanted to get as close to the physical gear as I can so I can understand what’s really going on. As we discussed earlier, assuming a cloud service already exists makes the initial setup much easier, but that assumes an awful lot about how the infrastructure actually functions.
My goal is to learn, not merely to get things running, because I want to understand why certain choices are better than others. Learning involves trying things and making mistakes, so that’s part of my aim here.
A great online guide for starting off with Kubernetes is the Creating a Custom Cluster From Scratch guide. It took me a while to read a bunch of different guides to Kubernetes before settling on this one as a good starting point for what we want to do.
Hardware
I’m using my Scale Computing cluster, which is three HC1000 nodes running Scale’s KVM based HC3 hypervisor. This gives me 12 cores, 96 GB of RAM and 6TB of disk to play with, which is plenty for a reasonable sized cluster. You can run a tiny Kubernetes environment on your laptop or desktop using something like minikube, but I want to do something a bit bigger than that. It’s a relatively small cluster environment compared to what you’d run in production, but a Scale cluster is enough to run a decent sized business on, so it should give us plenty of room to grow things if this experiment goes well.
The cluster is connected to a single Dell N1524 switch, which gives us plenty of bandwidth and lots of gigE ports. The cluster nodes have two connections to this switch: one for the frontend network, and one for a dedicated inter-node backend network. Ideally you’d dual connect the nodes to a second switch for redundancy, but this is a lab network and I don’t have a second switch. One is noisy enough.
Network Setup
Traffic is separated from each other logically using VLANs configured at the switch. Lab traffic is left on the default VLAN, VLAN 1, which serves as the frontend network for the cluster. Cluster backend traffic is kept separate on VLAN 10, which is dedicated to the backend ports and not forwarded outside of those ports.
I’ve set up a new VLAN to act as a separate ‘cloud’ network for our Kubernetes experiment on VLAN 100. Getting this to work with the Scale cluster and this switch means configuring the ports quite specifically, and finding doco on this was tricky, so hopefully this will help other Scale Computing users out there who want to do something similar.
The backend ports are placed in Access mode for VLAN 10 Here’s what it looks like:
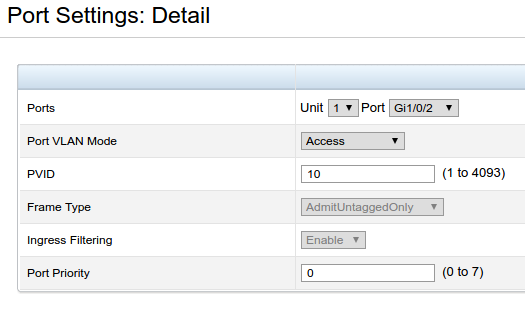
VLAN 10 port configuration
To have VLAN 10 and VLAN 100 work for the cluster means placing the frontend network ports in General mode, which means it will accept both tagged and untagged traffic. This is so that traffic from other systems in the lab, which will be untagged, can connect to VMs in the cluster with interfaces on VLAN 1, such as our main admin VM that we’ll configure in a moment.
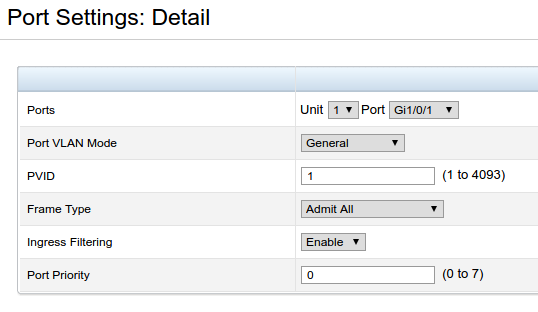
Frontend network port in General mode
What happens is that the untagged traffic is placed in VLAN 1, because that’s what the PVID setting says. We could place it into any VLAN we like. If we set the Frame Type to AdmitTaggedOnly instead of Admit All, only VLAN tagged frames would be allowed into these ports, and our connectivity wouldn’t work the way we want.
Now that our networking is set up, we can set up a server VM on the Scale Cluster to act as our main admin node for our little Kubernetes cloud environment.
Admin VM
Building a new VM in the Scale Computing environment is pretty easy. I’ll be using Ubuntu 16.04 LTS for mine, because that’s what I’m most comfortable with, but go ahead and use whatever you like. You’ll probably want to use a Linux distro if you want to follow along with this series, though, because Windows uses quite different administration paradigms.
I created a new VM to act as our admin server. 1 CPU and 1GB of RAM should be enough, and we can adjust this later if we need to (yay VMs!). I’ve given it 50GB of disk which should be plenty.
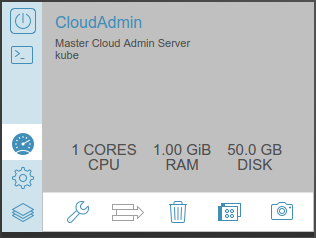
Cloud admin server config in Scale Computing interface.
We’ll need two network interfaces: one on the ‘public’ lab network of VLAN 1, and one on the ‘cloud’ network internal to the cluster: VLAN 100. I have a DHCP server in the lab which will automatically assign an IP for the VLAN 1 interface, and we’ll address our cloud system internally, using this host as the main admin server.
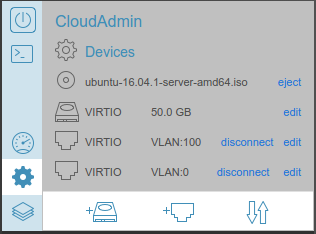
Cloud admin server network config.
I’ve chosen a /16 network for the overall cloud network, and individual Kubernetes cluster/pod networks will live inside this addressing. I’m still learning about how Kubernetes networking actually functions, so we might need to tweak this later, but it should give us plenty of room for now. Our admin VM will be on IP 10.75.0.1/24. We won’t worry about IPv6 for now because it’s not supported for Kubernetes pod IPs as yet (alas).
From here we power on the VM and build it as you would a standard Ubuntu 16.04 server. Once that’s done, we’ll be ready to start setting up our Kubernetes cluster and all the services we’ll need to administer it.
Pingback: Gestalt Server News 16.2 - Gestalt IT